![]()
13721 Spring Hill Dr., Spring Hill, FL 34611
Phone: 352
688 8160 M-F EST
PROWLER
Polished Engine Bay
Support
Bars©
PART# ACC-823007
INSTALLATION INSTRUCTIONS
These custom bars are made of high quality 304 stainless hand polished to a beautiful finish. The bars have been designed to replace the factory bars and come to you with decorative hardware for that truly custom finish.
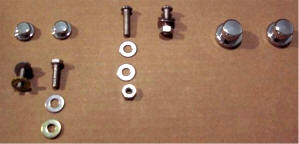
Included:
|
2 x large chrome bolt
caps 2 x small chrome bolt caps 2 x ¼ 20 button head bolts 2 x ¼ 20 nuts |
2 x extra thick ¼ washers 2 x 6mm 1.0 x3/4 bolts
6 x ¼ stainless flat washers |
 |
-
Remove the two bolts securing the bars at the wiper cowl area.
NOTE: These will not be reused.
-
Remove the two nuts atop the shock towers and set aside.
-
Remove the two remaining bolts over the radiator area. NOTE: These
will not be reused.
- You
will notice that the new bars have an offset shape to them. Match
each of the bars offset to the factory bars and set them to the
factory position. Make sure that the oblong holes in each bar are
set to the shock tower.
-
You have been
supplied with two button head stainless ¼ 20 bolts/nuts and four
flat washers. Use this hardware to attach the bars at the wiper cowl
area but do not tighten at this point. With the four bars emanating
from the shock tower stud align the two front bars to the two holes
at the front radiator area. Insert the two remaining 6mm bolts
through the two stainless washers and bars and hand tighten them
into the factory threaded hole. NOTE: You have
been supplied with two special thick
washers to be used with
our custom radiator cover. If you are not installing our custom
radiator cover do use these washers.
- Now
that you have all four bars in place and all the hardware set in
place you can now tighten the rear bolts as well as the front bolts
leaving the center nut for last.
- You have been supplied with two large decorative chrome caps. Install these two caps over the shock tower nuts by applying a small dab of clear 100% silicone to the under side of the cap and then set in place. Make sure not to apply to much silicone as this will ooze out and make a mess. The two remaining caps will simply press onto the two front bolt heads.
Questions? Please
contact us at: admin@TheProwlerStore.com
TheProwlerStore.com is a Hot Car Accessories, Inc. site