![]()
Phone: 352
688 8160 M-F EST
PROWLER Deluxe Door Sill Overlays©
PART # ACC-821003
INSTALLATION INSTRUCTIONS
***We highly recommend professional installation on this part.***
Included:
2 x 2pc. Stainless jam/sill overlays, 2 x promoter packets, 6 x (6mm
x 25 Phillips flat head screws), 1 Tape Test Kit,
2 x pieces of 60 inch 1/8" cowl molding, 2 x pieces of 60 inch 5/8"
cowl molding.
NOTE:
Your new overlays come to you with a protective liner. Do not remove
until installation is complete.
NOTE: You may remove these sills once installed without damaging
your car. However the sills themselves will be damaged and not
reusable.
Your new overlays
come with a protective liner. Do not remove until installation is
complete.
1.
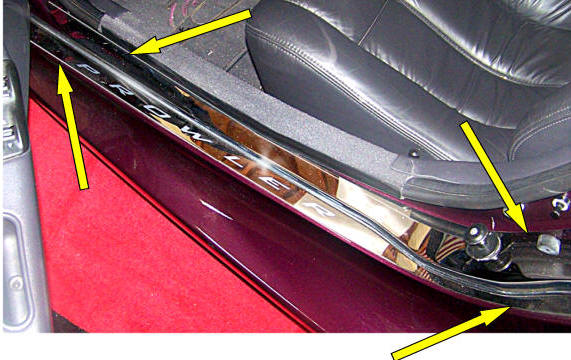
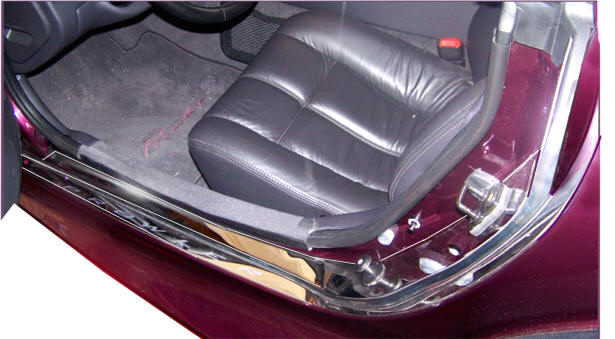
The first step of this application will be to remove the two door
catches from the door jam. Before doing so you will need to mark there
position so you will be able to reinstall them with the least amount of
trouble. Using a square or a square section of cardboard place the
square over each of the two catches so that your square seats flush to
the cars jam and the catch. Mark the square and the catch as well as the
car jam. This will enable you to see just were the catch lined up after
you place the overlays in position. After you have successfully recorded
there positions remove them completely from the cars door jam.
2.
Scrub the entire door jam /sill area first with rubbing alcohol to
remove any and all dirt Place the top section into the upper door sill
area and carefully adjust its shape so that the section conforms to the
shape of the car. This will take several attempts before you will
achieve a nice contoured fit without forcing the shape. If done
correctly the part will lay in place in such a way that when permanently
attached it will have no tendency to lift or detach long term.
3.
One you are satisfied with the fit, remove the red release liner from
the back of the section and carefully reposition making sure the three
square holes line up closely and also the overall position of the
section leaves about an eighth of an inch or so overlap towards you.
4.
The next step is to apply the larger chrome trim in position. Starting
at the top of the door opening you will notice that you will be able to
slide the very top edge of the trim under the black plastic trim. Insert
there and firmly set the trim under the overlap of the section you just
installed and also firmly against the painted surface as you peel the
red release liner. This part of the installation will nicely cap and
finish the upper section of the door jam.
5. In this next section to be installed you will notice that the lower part closely matches the contour of the chrome trim you just installed. Adjust the shape in the same way as the top section and install it tightly against the chrome trim. Note this will create some gaps in places but donít worry these will be taken care of in the next step. Once you have successfully installed this section remove the protective liner.
6. You have been provided with a small diameter length of chrome trim. Starting at the top of the section you just installed peel the red release liner as you place the trim directly to the stainless and tightly against the chrome trim to close any and all gaps that may have been created. Trim away any excess molding and firmly press along the entire length to set.
If any questions occur during installation please contact Admin@TheProwlerStore.com
CARE AND MAINTENANCE:
Note: Care must be taken when cleaning your covers. It is a good idea to lightly dust your covers with a clean soft cloth first in order to prevent any particles from scratching them. Then wipe (using a new clean soft cloth) with a good quality streak free glass cleaner.


TheProwlerStore.com is a Hot Car Accessories, Inc. site