
13721 Spring Hill Dr., Spring Hill, FL 34611
Phone: 352
688 8160 M-F EST
Prowler (1997-2002) "Deluxe" Stainless Steel Grille© - High Polished
PART# ACC-822034 & ACC-822035
INSTALLATION INSTRUCTIONS
Parts included:
1 x Stainless steel retro grill
5 x 3/4 round furry Velcro pads
1 x 36”long ¾ wide mat black vinyl strip
NOTE: The stainless retro grill will sit about 1/4" higher than the stock OEM grille to emulate the styling to the vintage roadsters of the past. You will adjust your hood bumper stops to compensate for this. In addition your stainless grille will need to be hand formed (bent slightly) to match your Prowlers front end. Read all the directions before starting.
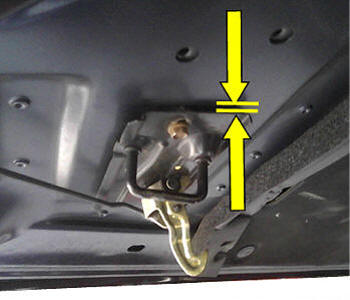
1. Remove
the factory grille by opening the hood and unscrewing the three screws
securing the three factory grill to the body. Remove the two additional
screws securing the sides of the grill to the inner frame of the body.
Pull the grill towards the back of the vehicle to detach the lower grill
chin pin from the body. See Diagram 1 below.
2. Your new grille insert will install in much the same way as the factory grill was removed but without the two center metal attachment arms and screws. They won't be necessary.
3. Before
you begin to install your new grille we recommend that you treat the
newly exposed area behind the factory grill for the best looking end
result. You can do this by thoroughly cleaning the exposed areas as well
painting the aluminum frame and any light colored items black.
We have provided you with a strip of mat black adhesive vinyl to be
applied to the inner rim of the newly exposed fenders. To apply this
vinyl simply scrub clean this rim and then carefully peel the release
liner from the back of the vinyl and apply it directly to the rim about
1/4” in from the outer edge. This will blacken the inner edge of each
fender which would otherwise be seen through the new grille.
4. Now
that you have prepared your opening you can now set the new grill in
place. Before you begin take a minute to make sure your new grille has a
nice curve to it. Although your grill comes to you pre-shaped it will
almost always be necessary to shape the grill further by hand in order
to achieve a nice contoured fit.
Force the chin pin at the bottom of the new grille into the notch at the
base of the opening. Make sure that this is thoroughly and firmly
seated. This is important because you do not want to have
excessive pressure on the grill once you close your hood. In fact
since all Prowler vehicles where handmade each of them may have a slight
variation from the bottom of the opening to the underside of the hood.
To overcome this it may be necessary to adjust the hood stops up or down
to achieve the perfect arrangement.
With the chin pin correctly inserted set the top of the grill over the
three exposed screw locations at the top of the grille. It is also
important to make sure your grille is set correctly at this point. This
may take a couple of adjustments so that the grill tucks nicely under
the hood. We have designed the new grill to look like it is attached to
the hood when closed just like they were in the old days. However, you
do not want the grille to damage the paint on the underside of the hood
so we have provided five ¾ fuzzy Velcro pads to be placed under the
hood at the two corners where the grill may meet the hood at the dead
center and in between those two points. This will prevent any possible
damage to the paint long term.
IMPORTANT: FITMENT TIPS - Shut the Hood gently the first
time to see if it clears the grille top:
1. Make sure the Grille is completely seated at the bottom.
As low as it can go.
2. If you push
the Grille back towards the engine when mounting it will allow extra
space for the hood to close (See diagram 1).
3. Twist the hood stops counter clockwise to raise them up.
This will give you more clearance so the grille will fit (See diagram
3).
For that 1 in a 100 Prowler. Because Prowlers are all hand fitted
they do vary per car. Sometimes there is a Prowler that is a
little more off than the usual variance. If you are still having a
problem closing your hood because the grille is too high you can also
use this tip.
Put a
spacer (like a washer or two) under your hood latch. Remove the
latch base and insert one or two washers and then reattach.
See photo below:
CARE AND MAINTENANCE: Care must be taken when cleaning your cover. It is a good idea to lightly dust your cover with a clean soft cloth first in order to prevent any particles from scratching it. Then wipe (using a new clean soft cloth) with a good quality streak free glass cleaner.
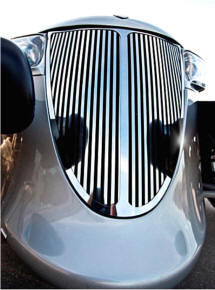
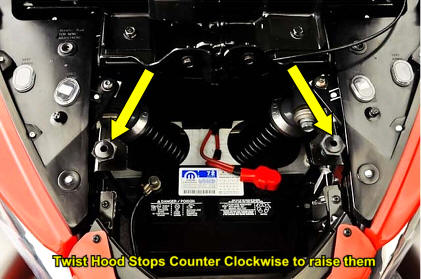
Diagram 1 Diagram
2
Diagram
3