![]()
P.O. Box
6259, Spring Hill, FL 34611
Fax: 352 666 4141
Prowler Inner Wheel Savers©
PART# ACC-822030
INSTALLATION INSTRUCTIONS

Included: 2 x Brushed Stainless Wheel Savers, 2 x Adhesive Promoter Packs, 1 x Replacement Attachment Tape
Finally an esthetic cure for the Prowler rear wheel problem, for years
Prowler owners have had to deal with the rear wheels pitting and peeling
on the rim
in back of the spokes. Now you can beautifully seal this area
with our stainless steel band permanently eliminating the unsightly
deteriorating chrome finish.
NOTE: Your new cover comes to you with a clear protective liner. Do not remove liner until prompted to by instructions.
1.
Jack up the rear of your
Prowler and set it on a pair of jack stands for safety.
2.
Remove the rear wheels.
3. If your wheels are fitted
with stick on balancing weights mark the location of the center of each
of these weights at the spokes with a grease pencil or washable marker.
This will allow you to put them back in the same spot - but on top of
the Wheel Saver.
Using a putty knife and pry the weights off. They will come off
easily. You have been supplied with some replacement attachment tape for
these weights. Simply roll the original adhesive off completely with
your fingers and apply some adhesive promoter (provided) and then
re-apply the attachment tape on to the back of each balancing weight.
When directed to - reinstall the weights at the marked location after
installation of the savers is complete directly on the saver.
NOTE: It is very important to use the adhesive promoter
(packets included) to insure a good permanent bond of the weights, so be
sure to apply it not only to the weight but to the saver surface where
you plan on putting the weights back as well.
4. With the weights removed
scrub the inner wheel with alcohol to remove any and all oil and dirt.
Then swipe the entire area where the wheel weights will be mounted on
the Wheel Saver with the adhesive promoter (packets provided). Let sit
until instructed to continue this part.
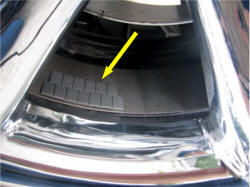
5. Now, set the wheel saver in
position into the wheel and check the fit. A properly fitted saver will
have little or no gap at the seam where the two ends come together
exactly.
NOTE: It looks best if you put the seam behind a spoke in
the wheel see photo bottom right.
It may take a little force to make sure that the saver is completely
expanded to the rim. Now that you have checked the fit and familiarized
yourself with just how it sets in place you can begin the permanent
installation.
Peel back a small
portion (about three inches) of the red liner on your wheel covers and
fold it over to the side in such way as to allow you to pull the liner
off slowly as you mount the liner to the wheel. Place the
 entire Wheel
Saver back into the wheel and position the liner perfectly how it will
be mounted.
entire Wheel
Saver back into the wheel and position the liner perfectly how it will
be mounted.
NOTE: It is important to keep the Wheel Saver lined up so
that when the ends meet at the seam they match perfectly.
While the Wheel Saver is inside the wheel - Pull the red liner slowly
being careful not to allow the liner to tear as your pulling it or
allowing it
to touch the wheel surfaces where it stick in place before
you line it up properly. Pull the liner continually all the way around
to the start point
so that it is removed completely.
Now press firmly along the perimeter to set the Wheel Saver to the inner
wheel.
6. Peel off the clear
protective liner. Then finally reposition the wheel weights (where you
marked their position) and press firmly to set.
You may now re-install
the wheel.
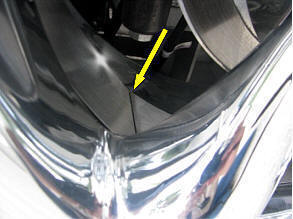
7. Now take your wheel weights and peel off the tape on the back
of them. Stick on the new tape provided and place on the wheel
saver where you put your mark on the side of the wheel. See photo
middle right.
8. Repeat process for each
wheel.
Questions: Please
contact us at
admin@TheProwlerStore.com
TheProwlerStore.com is a Hot Car Accessories, Inc. site
Copyright 2005 - 2024
Not affiliated with
Chrysler Corporation
or it's divisions.


