
Phone: 352
688 8160 M-F EST
Prowler Fender Stainless Steel
"Extra" Chin Guard Protection
PART#
ACC-822059
INSTALLATION INSTRUCTIONS
Instructions for the installation of the Plymouth prowler chin guard extension.
Liner info: Your new accessory comes to you with a blue protective surface liner. Do not remove this liner until instructed.
Parts list:
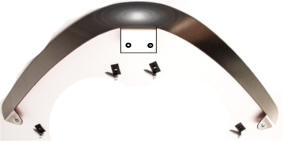
1 x stainless steel chin guard
1 x packet of adhesive promoter
2 x washer head style screws
2 x flat nuts
Need: drill and bit
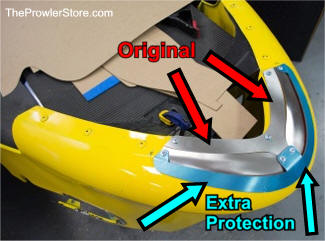
This prowler chin guard extension has been designed as an add on section to the ACC-822055 standard prowler chin guard. It is not designed to installed by itself.
The section will offer additional protection beyond the original bumper chin guard. It will be slightly more noticeable.
1. Thoroughly scrub clean any and all road grime dirt and wax from the painted area just in front of the existing chin guard.
Apply some masking tape to the area to see if the tape has a good tack. If it doesn't re-clean the area until it does.
2. Once you have cleaned the area well swipe the area with the adhesive promoter proved. This chemicals is not a cleaner but an adhesive primer and must be used as such in order to achieve a nice efficient long term bond!
Remove the two outer screws and flat nuts securing the two outer corners of the existing ACC chin guard and set aside for a moment.
3. Before you take off the rear protective cover on top the tape and before you permanently attach this part, place it into position to familiarize your self with just how it is intended to install.
Although the section comes to you with the mounting tabs preformed you will still need to Shape the section by Hand in order for the section to contour correctly to the chin of your prowler. Keep in mind the section has been designed to wrap around the chin in such a way that the section to a large existent will conform itself to the chin of the prowler offering a very nice tight and snug fitment with no gaps. A properly set section will have no buckles or gaps and will be permanently attached to your prowler offering a very stable and efficient additional protection.
Now that you have a good idea of how this section is intended to fit the first step will be to remove the red release liner from the back of the section and then stick the section over the two front hole in the existing chin guard. Peel back a section of the blue protective liner to expose the two holes at the center tab. Using the two washer head screws provided, self tap them directly into the two holes as you set the two flat nuts to the Inner side of the chin. Because the chin of the prowler is a relatively soft material these flat nuts must be used to secure this section efficiently.
The next step will be to rap the stainless section around to the outer holes exposed earlier and force the two holes to line up as you reinstall the screw and flat nut for both sides. Then remove the rest of the protective liner to Finnish the Installation.